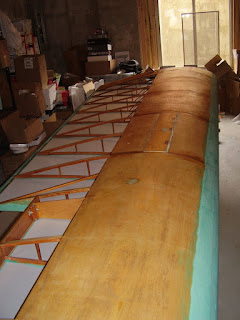
Friday Leah and I gathered supplies to be able to mount my wings to a couple of engine stands that Harry had at his shop. We figured this would be a good way to control the orientation of the wings while covering them. Jesse came down friday night and by then Harry was ready so we went out to the shop with the trailer and wings and worked. Drilled some holes in the big chunks of aluminum angle that i bought, which worked out really well.

We were finished around 11:30 and had the wings and everything else loaded up and were out the driveway around midnight. I'm curious what Nick's neighbors were thinking as we were unloading wings in the street at 12:30 AM and carrying them into his back yard, dropping them down a sort of dugout area and into his basement.
Saturday morning we started working on the bottoms of the wings. I knew the general Stewart's process from doing the control surfaces but had never covered anything nearly as big as a wing before. We started out by cleaning the wings with the heavy duty cleaner, and then painting glue around the perimeter of the wing and along each rib. Then, with the glue somewhat dry, we laid the fabric in place over the wing and used the iron to re-activate the glue and set the position of the fabric. This worked like a dream.
We glued 3 inches either side of the leading edge and along the root and tip and both side of the trailing edge. The fabric laid in place pretty well. We would heat the leading edge in place first and then work the top of the leading edge in place. With the rest of the fabric blanket free to move there were very few issues with wrinkles. Then we'd attach the trailing edge, root, and tip. Then flip the wing over and do the top of the leading edge and the top of the trailing edge.
I usually tried to keep my little hobby iron at about 250 -300 for this work. It's a bit challenging for it to hold a really constant temperature though. With the perimeter of the fabric blanket tacked in place we brushed glue through the fabric and then wiped off the excess to complete the joint. Then we heated up the Cheapest Iron At Wal Mart to 250 degrees for an initial shrink. This was mostly to get the major wrinkles out of the fabric, not to tighten it up too much. Then with the fabric slightly shrunk we went back to the hobby iron and set the glue on the ribs. Then brushed glue through to ribs and wiped off the excess. This seemed like a good time to go to the glider club meeting so we did. When we returned we glued in a couple of inspection rings and called it a night after a couple Leinenkugel's.
This morning we got back to work around 10 . First thing was to do the final 300 degree shrink on the bottom. I wanted the glue on the ribs to be good and dried before I tried to shrink up the fabric too much. There is a bit of concavity to the airfoil on the bottom and i didn't want any fabric pulling off the ribs. It shrunk up really nice with no issues. Then it was on to work on the top. Pretty much repeat the process for the top but it went a lot smoother cause we had experience.
So there you have it. Tomorrow we'll bring the wings back to the garage. I'm hopeful that weather will allow us to brush on a cross coat of EkoFill primer/UV block this week sometime, along with getting the fuselage prepped for fabric.
I've got a bunch more pictures on the way from Nick's camera along with a time lapse video of us putting the bottom fabric on the right wing. The video turned out really, cool, I'll probably post it on YouTube.


No comments:
Post a Comment