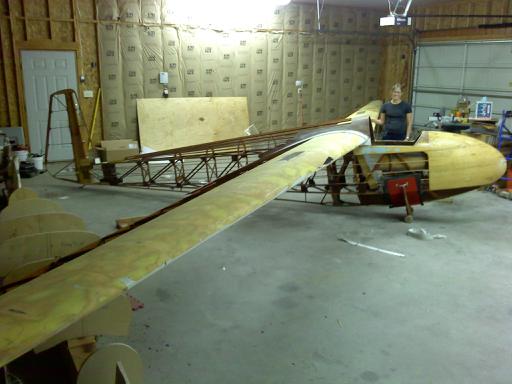
Last week I did manage to get to the garage a few nights. Matt came over to help and he cleaned the balsa facing off the left airbrake and removed both airbrakes. The hinges have some pretty decent corrosion on them. I kept working on the ribs on the right wing. New plywood arrived and the new rib shapes are traced out and ready to cut. I also received a package with a full set of ribs as well as metal fittings from Richard Beck. Thanks Richard! I used the rib in that package to make a template for a new rib to replace the one true rib that I removed on the right wing. So this week the goal is to make some sawdust and start putting parts back in the glider.
Yesterday we got 3Y out for the last day of scheduled operations at the club. This was the first time I have flown 3Y at Sunflower since my first flight in it this spring in May, when Summer and I landed out. Needless to say we have been on the road a lot with the glider this season. I added up the logbook and I think I had just over 50 hours in it this season. Not bad! Lift yesterday was weak and broken up, we had two flights, first one about an hour and the second one right at half an hour. Here are the traces:
http://www.onlinecontest.org/olc-2.0/gliding/flightinfo.html?dsId=2154811
http://www.onlinecontest.org/olc-2.0/gliding/flightinfo.html?dsId=2154816
Leah and I received some sad news on Saturday. Bud Brown, builder of 4653T, passed away on Friday. Awful news as I was very hopeful to get to meet him one day and show him 53T once we're finished with it. Here is Bud's obituary: http://www.emmonsmaceysteffey.com/sitemaker/sites/Emmons1/obit.cgi?user=501088Brown
This is the home for everything related to Cherokee II Sailplanes. Email me at abcondon@gmail.com if you have anything to add.
Monday, October 31, 2011
Sunday, October 23, 2011
Destruction complete, I think
Tonight I worked a bit to remove the broken rib. First, however, I was able to get a good look down the leading edge of the right wing thanks to the false ribs being removed. there was a bunch of mouse nest leftovers outboard of the hole I cut so I spent some time with the shop vac cleaning the wing out. Managed to remove everything I could see. I also was able to get a good luck at the adjacent rib bays and determined that I didn't need to remove any more skin which is great!
The last thing I did tonight was remove the main rib that I broke while removing skin. It didn't cause too much trouble. For now at least this is the last phase of destruction in this section of the wing. There is a chance I might end up re-working the trailing edge but that won't come until the rib repairs are complete. Here is a photo:
Removal
Harry stopped by to inspect the damage last night. He thought most of the ribs were probably OK and could be saved with some doublers. I had already removed the blantantly broken false ribs as those will be pretty easy to replace with new. Matt G came over to help and hit the not broken ribs with the sander to clean them up so we could see what we were dealing with. Both false ribs that weren't broken showed some pretty major cracking into the plys that was more than just the surface, so it was a pretty easy decision to remove them.
The main rib next to the airbrake box is also broken so it will probably get removed and replaced. I've ordered some plywood to cut new ribs. Here are some pictures of tonights destruction:
Thursday, October 20, 2011
Opening Right Wing
I started off tonight with the intention of squaring up the hole that I cut in 3T's right wing so that a new piece of plywood could be scarfed in to replace it. While doing that I looked towards the tip inside the leading edge and noticed that the next false rib was blatantly broken. So the hole went from this:
to this:
Not too bad I thought. However after looking at that rib, and noticing that the false rib next to it was also broken, I realized the easiest way to fix them would be just a complete replacement. The break was on the top back near the spar, not to mention the leading edges of all the ribs are in questionable shape thanks to the mouse damage. I also found some more mouse nest material in the new rib bay that I opened up and vacuumed some more out of the next bay towards the tip. So, I decided to remove the skin in the newly opened bay back to the second spar on top so the false ribs can be replaced.
Next I started careful work with the chisel to square up the aft edge of the original cutout. I noticed that one false rib was cracked which I wasn't particularly excited about. Then I managed to damage the real rib which forms the tip-side border of the airbrake box. That was it. The rest of the skin was coming off so I had full access to all the ribs in this area.
And thats where I stopped for the night.
Jacob was over earlier and we got the rudder cables finished and also he worked on sanding down the filler work we had done the other night. For the woodwork, next thing I suppose is to evaluate what to do with each rib in this area. Most of them are going to need some form of repair or replacement. Then I'll have to order some plywood and go to town. All the ribs on the Cherokee II are sawn from 1/4" marine plywood.
Wednesday, October 19, 2011
Last night I started cutting out the soft wood in the right wing leading edge. There was a mouse in there at some point. No nest but some shreds of foam, a few acorns, and other leftovers. I kept cutting until I was back to clean wood and couldn't feel or see significant damage in the past the next rib.
Bud Brown added 2 false ribs between each actual rib to help hold the profile. It seems to have worked well. The plywood skin is 1.5mm and there were places where there was at least another .5 mm of filler.
Tuesday, October 18, 2011
Filling
On Sunday Jacob came over to help and we started off working on finishing up the rudder cables. Well either I used up all my thimbles and sleeves or they were lost in the great re-organization which allowed the wings to go on 53T. There weren't very many left anyway so I've ordered a bunch more for the rudder, aileron, and airbrake cables.
Instead we mixed up some super fill and got to work. There was an area on the leading edge of the center section that needed smoothed out after the fabric pulled up some previous filler over the balsa leading edge. There were also some areas around the canopy that needed touched up and of course the intersection of the center section and fuselage. Jacob worked on that while I kept picking away at some stubborn fabric on the leading edge of the right wing. Along the way I found a short section of soft wood that will need to be replaced. It is 1.5 mm plywood and the leading edge on the Cherokee is non-structural so I don't think it will be too much trouble. Will be interesting to get a look inside the leading edge which has been closed up for the last nearly 50 years.
Friday, October 14, 2011
53T assembled
for the first time since about a year ago the wings are on 53T. No its not finished, we just put the wings on so that we can make the cables for the aileron and airbrake systems. I am just loving that it fits in the garage with room to spare!
Subscribe to:
Posts (Atom)